Lead extensions are now being Beta tested in Google Ads. These extensions can help you generate leads by engaging users directly from the search engine results page (SERP) for mobile and tablet users. Mobile search traffic is increasing and using lead form extensions can be a powerful conversion tool for marketers.
Creating a Lead Extension
To create a lead extension, follow the same process for creating other extensions in Google Ads. We offer this guideline, adapted from Google’s help guide on using lead form extensions in search ads. These steps will show how to add an extension to an already existing search campaign.
- Sign into your Google Ads Account.
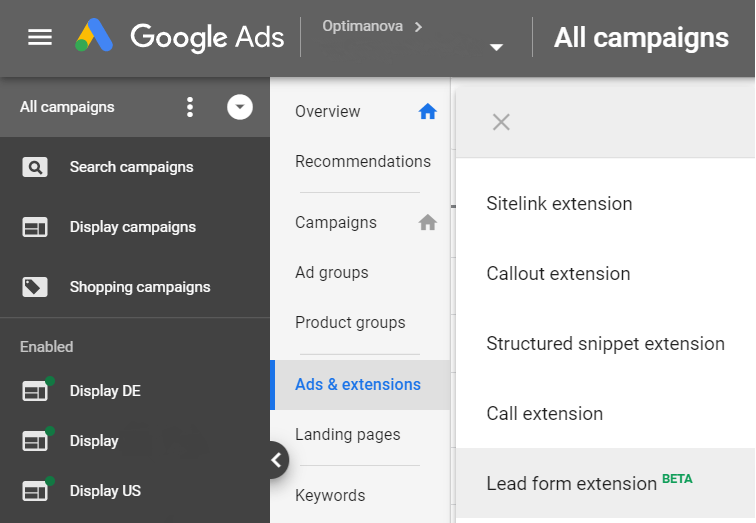
- Click on All Campaigns on the left hand menu.
- Click on Ads & Extensions in the menu in grey.
- Then click on the Extensions Tab.
- Next click on the
 button.
 - Choose Lead Form Extension.
- Select the campaign that you want to create the lead form extension for.
After clicking on create Lead Form Extension you will need to set up the extension in three distinct steps.
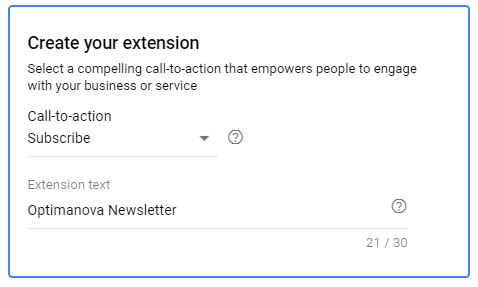
Step 1. Creating the Call to Action
First, you need to create a call to action.There are 8 different CTAs to choose from. Which one to choose is determined by your company’s marketing goals.
- Learn More
- Get Quote
- Apply Now
- Sign Up
- Contact Us
- Subscribe
- Download
- Book Now
- Get Offer
You will also need to write the extension text. This has a 30 character limit.
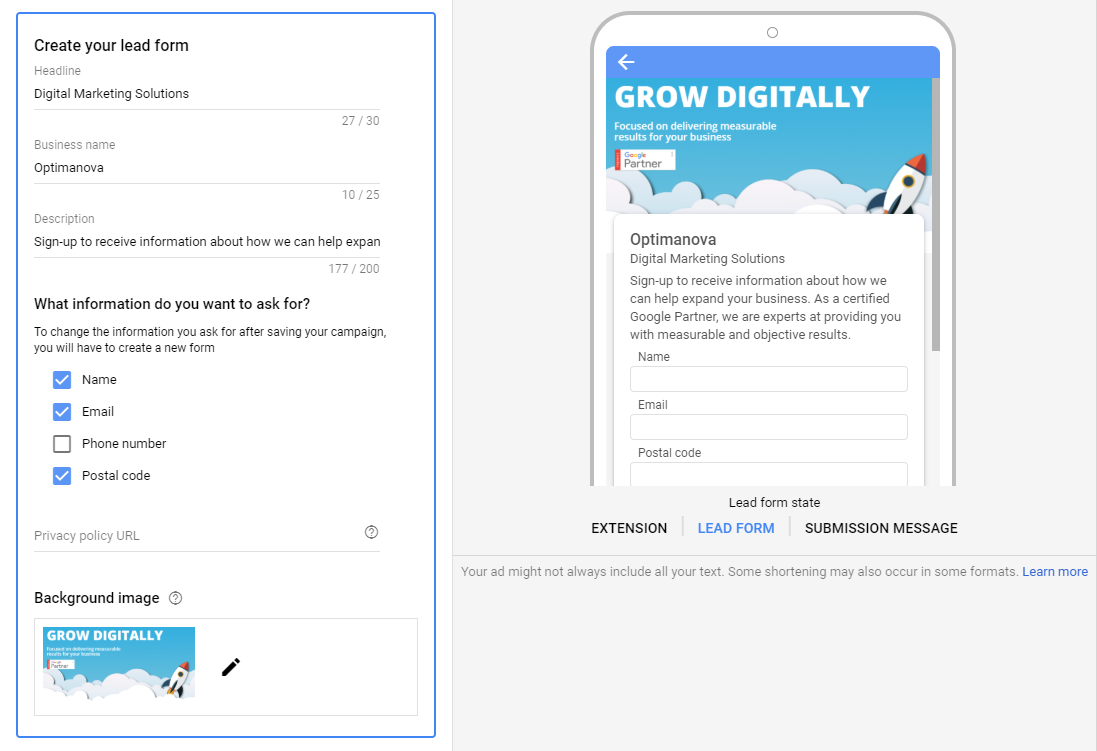
Step 2. Customising the Lead Form Extension
The next step will be to customise the lead form. This is what the user will see after clicking to expand the lead extension. Google allows you to customise this section so that you can optimise information gathered from leads. It is composed of the following parts:
Headline: 30 character limit.
Business name: 25 character limit.
Description: 200 character limit.
Information you want to collect: Choose from name, email, phone number, and/or postal code. You can choose to add all 4 or only one. If none are selected, Google automatically asks for name and email.
Privacy policy: Insert a URL that links to your company’s privacy policy. This is a must as Google requires you to link to your privacy policy.
Background image (optional): You can also add a header image to your lead form. The photo must adhere to Google’s imaging guidelines. The photo will be landscape oriented.
Step 3. Creating the Submission Message
The last step is to create the form’s submission message. This is what will be shown after your leads enter their information. This is a great way to thank customers, explain what contact they can expect and also to drive them to your website with a CTA. For this final section, you will need to prepare the following sections:
Description: 200 character limit.
Call-to-action (optional): Choose between none, visit website or download.
Call-to-action URL (optional): Landing page for CTA button.
Manage Webhook (optional): If this option is chosen Google Ads will send your leads to your customer data management system in real time. If this option is not chosen then you can still manually download from the ad extensions table into a CSV doc.

Accessing Data through Webhooks or Manually
With Webhooks, your leads and submitted forms will be sent directly to your customer relationship system (CRM). To configure this, Google requires a Webhook URL and Key. Your webhook URL will function as the delivery path. When a potential lead submits the form, an HTTP POST is sent to the URL. This allows the data to be sent in real time to your CRM system. Luckily, Google also allows you to test this function before launching the campaign to allow you to work through any glitches.
If you opt to not use the webhook, then you can download the leads manually into CSV. files. These can be found in your Google Ads account through your specific client’s page. Steps to find them are as follows:
- Click on All Campaigns on the left hand menu.
- Click on Ads & Extensions in the second from the left menu in grey.
- Find your lead form extension. There you will see two options:
- Download Leads, CSV file with plain text headers.
- Download Leads (CRM) [Beta], CSV file with static values which can then be used to upload manually into your CRM system.
Important Last Points
- This extension can help marketers gain leads from hard to convert mobile traffic.
- Logged in Gmail users will have their information automatically filled out in the form making submission even more convenient.
- Marketers pay for clicks and conversions. Any time the form is opened will count as a click and submitting the form will count as a conversion.
- Bidding is based on the campaign’s mobile and tablet bidding strategy and targeting options.
- There are markets that Google excludes from using lead form extensions. This content includes: Adult, alcohol, gambling, healthcare & medicines and politics.
While this extension is still being tested, it may soon be rolled out for all Google Ads clients. Using lead form extensions can help generate mobile leads and better target those interested in your products or services.